
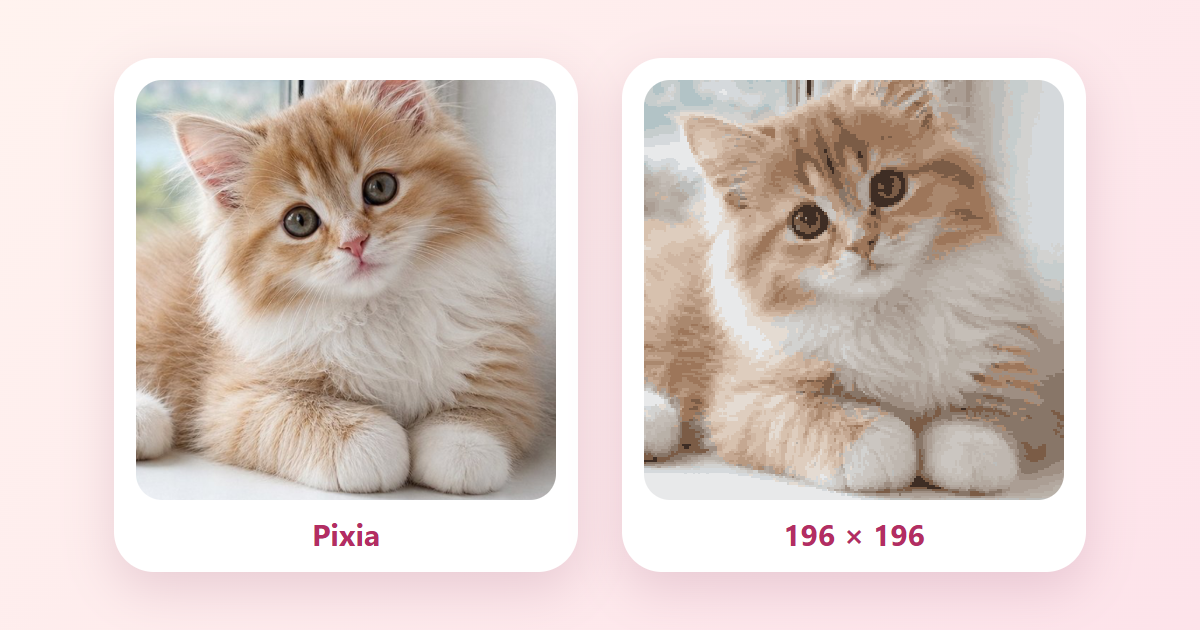
Most of us have a photo we would like to do something with, not just keep in the camera roll. In Pixia you can turn such a photo into a pixel picture by numbers: the image is split into cells, every cell gets a colour number, and you fill in the grid number by number. This guide explains cropping, the live result preview and all six grid sizes.
All screenshots were taken in the English version of the Pixia web app. As the source image we used a kitten illustration from the Artia Club gallery: it is a demonstration picture, not somebody's private photo. Your photo will look different, but the steps and the screens are the same.
What Pixia does with a photo
It helps to know what will happen to the picture before you create the work. Pixia places a square frame over the photo: drag the image, change the zoom and watch the pixel result update alongside it. The app then shrinks that chosen crop to the selected grid and builds a palette of up to 24 colours. Similar tones are merged, so there may be fewer: our example ended up with 21. Every cell receives the number of one of those colours. The result is the same kind of colouring you find in the Pixia catalogue, except the subject is yours.
One detail is written right on the form: the photo and the artwork made from it are saved on the Pixia server. The work is kept in your account, and you can colour it together with a friend. Only you and the people you invite to a room can see it. The photo may undergo a spot check. The work reaches the catalogue only if you offer it yourself, after the last cell is filled.
There is no need to shrink or compress the photo beforehand: the app only takes the square you selected. We tried a file of almost 29 MB, and the work was created just like one from an ordinary phone photo.
Which photo works well
The main subject does not have to be in the exact centre of the source. Drag the photo inside the square frame and use the Zoom slider: on a tall picture with a cat at the bottom and an empty wall above, you can move the cat into the result instead of keeping the wall. The grid overlay helps with composition.
The second rule is large shapes. A grid of 48 cells per side cannot hold thin whiskers or single blades of grass, but it shows a head, a back, a window behind the subject and a patch of light on the sill very well. The more of the frame the main subject takes, the clearer the result.
The third is contrast between subject and background. A pale kitten on a pale blanket may merge with it after conversion, because similar tones end up in the same palette colour. A darker background or a window behind the subject, as in our example, keeps the outline readable. This is not a ban on light photos, just a reason to compare two frames and pick the one where the outline of the animal or face is easier to tell apart.
How to create the work
Open Pixia and go to My works in the bottom bar. Above the list there is a Create from photo button. Tap it and a small form opens with the heading “Choose a photo and grid size”.
Everything then happens on one screen. Choose photo opens the device picker; the movable square appears on the left and the pixel result on the right. Replace and Change crop let you rebuild the composition. The size ladder offers 48, 64, 96, 128, 164 and 196 cells per side, with the exact total from 2,304 to 38,416 shown on every chip. Create artwork opens the colouring grid.
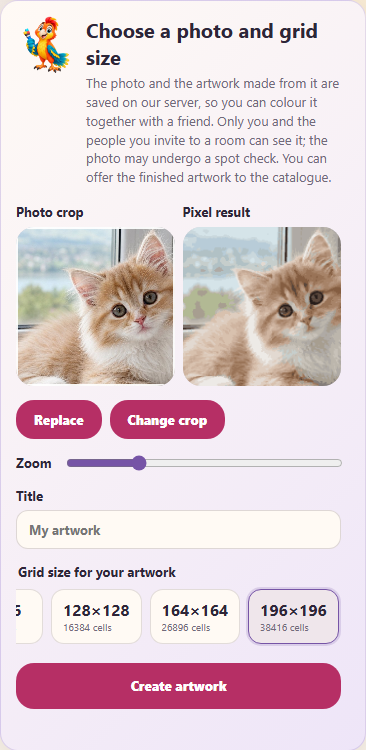
You can enter the title on this same screen, so there is no need to rename the source file first. If you leave the field empty, the work is called “My artwork”.
Which grid to choose
The six sizes contain 2,304, 4,096, 9,216, 16,384, 26,896 and 38,416 cells. Palette generation and image cleanup work the same way at every size; the important differences are detail and the amount of colouring.
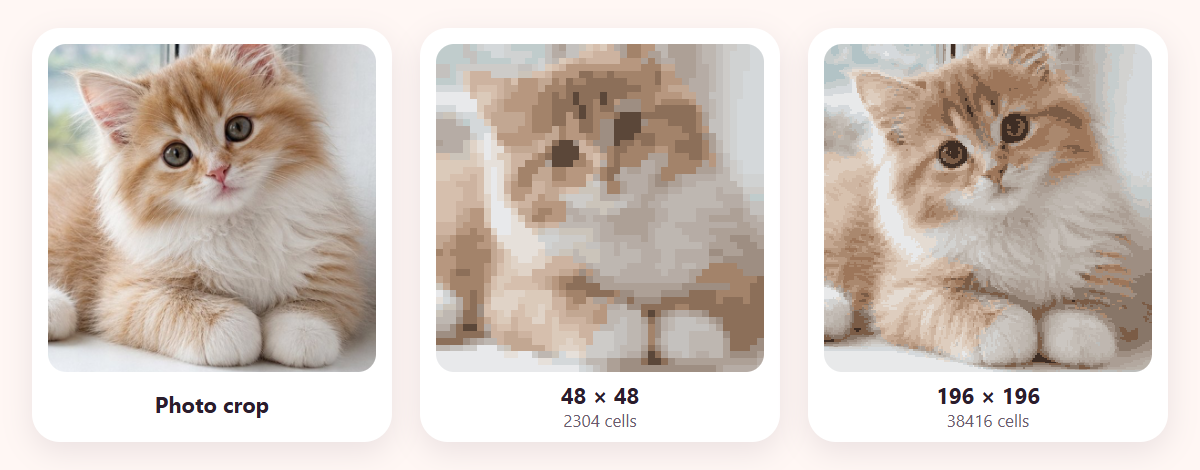
At 48 × 48 the large colour patches and silhouette are clearest, and the work is shortest. Sizes 64 and 96 add detail gently; 128 and 164 suit busier photos. A 196 × 196 work keeps more small transitions but has almost 17 times as many cells as 48 × 48, so it is a long project. The live preview lets you decide whether that extra detail is worth the time.
What happens after creation
As soon as you tap Create artwork, Pixia opens the grid. Every cell is labelled with a number, the palette sits at the bottom, and each colour carries a badge with the number of cells of that colour. In our example the first colour has 40 cells and the seventh has 100. At the top you see the title of the work, a progress bar and a counter of filled cells, “0 / 2,304 (0 %)”, and a timer runs above the grid.
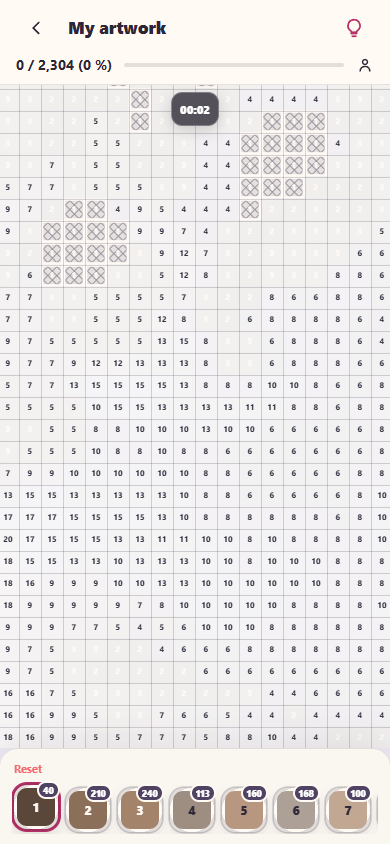
From here on it works like any Pixia picture: pick a colour in the palette and fill the cells with its number. The light-bulb button in the corner, Find, takes you to a cell of the selected colour that is still empty and circles it. Reset, above the palette, clears the progress after a confirmation if you want to start over. In kids mode the screen is simpler: these two buttons and the tool switch are not shown, a single tap fills the whole connected area of the selected number, and a work cannot be submitted to the catalogue from kids mode. For a first work it is pleasant to begin with the most numerous colour: large areas of background quickly make the picture feel like it is coming together.
Colour it together with a friend
A picture made from your own photo does not have to be coloured alone. In the open work, tap Colour together, the two-people icon at the top. Pixia creates a room and shows a Room ready window with the room code and the Invite and Copy code buttons. Send your friend the link or the code; you can keep colouring alone until they join.
Your friend opens the link and lands in the same grid: both participants are shown at the top, and filled cells appear for both. Only the owner of the picture can invite people, and the picture is not added to a guest’s own works.
Where to find the work later
The created picture appears in My works, on the tab of works in progress, labelled “Your own photo” with a cell counter, for example 0 cells out of 2304. A continue button opens it again. The work is listed right away, even if you have not filled a single cell yet.
The work is kept in your account, so you can return to it later. When the last cell is filled, the completion window shows a Submit to catalogue button. Before that the work cannot be submitted; afterwards it happens only if you decide so and sign in, and the work is reviewed before it can appear in the catalogue.
A few closing tips
Do not expect an exact copy of the photo from a pixel grid. It is a different genre: no more than 24 colours and square cells simplify the image on purpose, and that is where the pleasure is. Judge the result by holding the phone further away or zooming out, so the pixels turn into an image.
If you would rather practise on a ready picture first, open the Pixia gallery, for example Sleeping cat. We wrote about reading pixel images and why the silhouette matters more than detail in the article on pixel art basics. And if your photo is a picture of a pet, the guide to choosing a pet photo for a colouring applies here too: the advice about a recognisable detail and a calm background works just as well.